
How to Create Effective Reports Using Visure
Creating clear and effective reports is crucial for managing and communicating project requirements, traceability, and test results. Visure offers robust export capabilities to Excel and Word, allowing you to customize your reports according to your needs. This guide provides tips and hints to help you create professional and actionable reports.
1. Choose the Right Export Format
- Excel: Best for tabular data, analysis, and flexibility in filtering or sorting information.
- Word: Ideal for formal documentation with structured narratives or summaries.
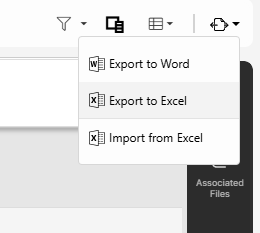
2. Steps to Export to Excel
To export to Excel effectively, follow these steps:
Select the Columns to Export
- Navigate to the document or module you want to report on.
- Use the column selector to include only the necessary attributes (e.g., "Approvers," "Approval Due Date," "Test Status," "Test Results," "Tester").
- Avoid cluttering your report with unnecessary data.
Filter the Data
- Apply filters to focus on specific elements or criteria (e.g., filtering only tests marked as "Failed" or requirements with a "High" priority).
- Filtering ensures the report is concise and relevant.
Save the View Configuration
- Save your selected column and filter configuration as a View.
- Access this View later from the Views Section to generate updated reports with the same settings, saving time and maintaining consistency.
Export to Excel
- Once your data is ready, click Export to Excel.
- You can export the whole document or select the ones you need.
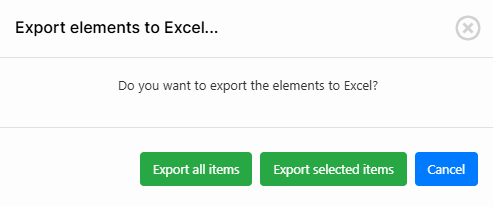
- Visure will apply your filters and selected columns to the exported file.
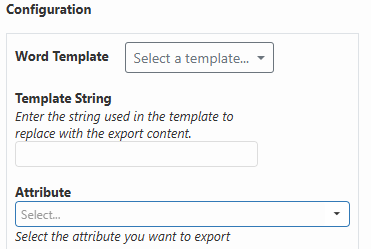
3. Steps to Export to Word
- Open the document you want to export.
- Create a new configuration
- Optional, use your own Word Template.
- Filter the items/requirements you want to export by selecting an attribute from the dropdown menu. This gives you control on the export and allows you to create different configuration based on your needs
- Customize the structure of the document by organizing the data hierarchically (if needed).
- Apply formatting or templates to ensure the Word document adheres to your organization's reporting standards.
4. Tips for Using Filters Effectively
Filters are a powerful tool for creating focused reports. Use them to:
- Highlight approvals by showing attributes like "Approvers" and "Approval Due Date."
- Track test results by filtering attributes such as "Test Status," "Tester," or "Execution Date."
- Focus on critical requirements by filtering for high-priority items or those with unresolved issues.
5. Saving and Reusing Views
Saved views streamline the reporting process by letting you reuse configurations for future reports. Here's how:
- After setting up your columns and filters, save the configuration as a View.
- Access this View any time to quickly generate reports with consistent formatting and data selection.
6. Additional Best Practices
- Plan Your Reports: Before exporting, define the purpose of the report and the audience. This helps in selecting relevant data.
- Review and Refine: Preview your report before exporting to ensure clarity and accuracy.
- Automate Where Possible: If you need to generate the same report frequently, save configurations to reduce effort.